Unit 02 Materials, Techniques and Processes
Materials,
Techniques and Processes Analysis sheets


~~~~~~~~~~~~~~~~~~~~~~~~~~~~~~~~~~~~~~~~~~~~~~~~~~~~~~~~~~~~~~~~~~~~~~~~~~~


Material/Technique/ Process Name: Pencil
Variations or types i.e. 2B 2H pencil or shape/motion
tweening:
How do you use the material/ Step by step instructions for
technique or process?
Take the pencil in your hand with a comfortable grip using
your thumb and fingers, and use the tip of the pencil to draw onto the paper
and use drawing techniques.
Relevant dimensions or constraints:
Cylinder base joined to a cone usually made of wood. The end of the pencil becomes blunt over the time of using it and it shortens when you sharpen
the end.
Linked techniques:
cross hatching, shading, colouring, stipping, scumbling, back and forth stroke and more.
Health and Safety issues related to Material, Technique or
Process:
The object can be dangerous if used incorrectly because of
its pointy end.
Evaluation (How you found exploring each Material, Technique
or process)
It was interesting to explore the different techniques and process that the pencil can be used for.
It was interesting to explore the different techniques and process that the pencil can be used for.
The dangerous pointy end of a pencil,
if used incorrectly could harm you or nearby person.
7 Different types of line/stroke drawing techniques:
1.dark and light lines to show a difference in lighting
2.lines that show the direction of an object
3.lines that show depth
4.lines that show scale
5.lines that can show objects overlapping
6.lines that show how an object looks it shows it's form
7.lines that can show movement
using the 7 drawing techniques on objects
1.a ball with dark and light lines to show lighting
2.lines to show the direction in which the ball is moving
3.lines to show depth of a ladder
4.lines to show scale of different size sticks
5.overlapping circles on a caterpillars body
6.lines to show the form of a tube
7.lines to show the movement of a ball and its direction
In the visual recording unit i used some of the drawing techniques I learnt here.
here i drew multiple building in 3 point perspective using lines that show depth, scale, direction and overlapping.
Here i drew a show with lines that show form.
Material/Technique/ Process Name: Pen
Variations or types i.e. 2B 2H pencil or shape/motion
tweening:
Gel pens, fine liners, ballpoint pen, fountain pen, coloured
pens and more.
How do you use the material/ Step by step instructions for
technique or process?
Take the pen in your hand with a comfortable grip using your
thumb and fingers, and use the tip of the pen to draw onto the paper and use
drawing techniques.
Relevant dimensions or constraints:
Usually cylinder base joined to a cone. It can run out of ink and it
isn’t designed to write upside down.
Linked techniques:
cross hatching, shading, colouring, stipping, scumbling, back and forth stroke and more.
Health and Safety issues related to Material, Technique or
Process:
The object can be dangerous if used incorrectly because of
its pointy end.
Evaluation (How you found exploring each Material, Technique
or process)
It was interesting to explore the different techniques and process that the pen can be used for.
It was interesting to explore the different techniques and process that the pen can be used for.
The dangerous pointy end of a pen,
if used incorrectly could harm you or nearby people.
There are many different ways you can shade an object.
Exploring these different ways helped me understand more about shading and how it's done.
Exploring these different ways helped me understand more about shading and how it's done.

Drawing a pile of cubes and then shading them.
This was a fun and interesting exercise.
Material/Technique/ Process Name: Paper prototyping
Variations or types i.e. 2B 2H pencil or shape/motion
tweening:
Web designing, Game designing, Software designing, App
designing and usability testing.
How do you use the material/Step by step instructions for
technique or process?
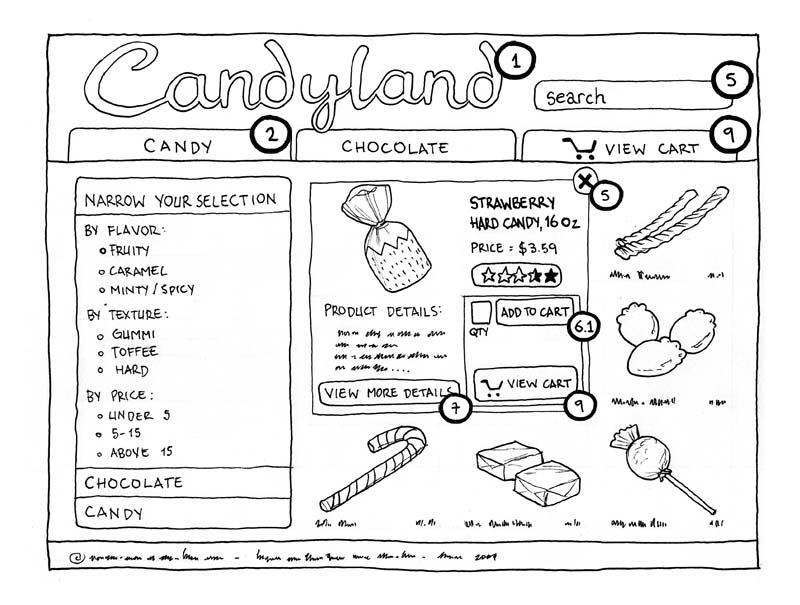
It’s basically just drawing designs on paper and figuring
out how the website would look and work.
So use pens or pencils to draw up some website designs (or
whatever you are designing) on more then one sheet of paper (A4 or A3 is fine) e.g. you are making a
paper prototype for a website, first you draw up the design of the main page
with all its click-able buttons and then you draw up other pages that these
click-able buttons will bring you to. It’s that simple.
Relevant dimensions or constraints
The size of paper that you have chosen to use to make your
paper prototype.
Linked techniques
usability testing
Health and Safety issues related to Material, Technique or
Process
The material you will be using is paper so be careful to not
get a paper cut and if you are using scissors be careful when cutting paper. And also be careful when using the pen or pencil because of it's pointy end.
Evaluation (How you found exploring each Material, Technique
or process)
Exploring the different ways that paper prototyping can be used for was fun and interesting because i had never heard of this process before it was a new experience. I will most defiantly be using this process again.

Exploring the different ways that paper prototyping can be used for was fun and interesting because i had never heard of this process before it was a new experience. I will most defiantly be using this process again.
The paper prototype i made for a website called The Poetry Slam
This is the front page of the websites with all it's buttons to explore/interact with the website.
~~~~~~~~~~~~~~~~~~~~~~~~~~~~~~~~~~~~~~~~~~~~~~~~~~~~~~~~~~~~~~~~~~~~~~~~
Material/Technique/ Process Name: Thumbnail sketching
Variations or types i.e. 2B 2H pencil or shape/motion
tweening:
You can do thumbnail sketching for whatever you want to sketch
e.g. sketching characters, landscapes, everyday objects, buildings, website designs, game designs, different drawing styles, eyes and anything else you can think of really.
Here are a few examples done by other people: 1 2 3
You can do thumbnail sketching for whatever you want to sketch
e.g. sketching characters, landscapes, everyday objects, buildings, website designs, game designs, different drawing styles, eyes and anything else you can think of really.
Here are a few examples done by other people: 1 2 3
How do you use the material/Step by step instructions for
technique or process?
well since its sketching the materials needed would be a pencil and some paper.
The process is that you draw lots of little sketches of whatever you want to sketch, and draw them side by side and once you think that you have drawn enough you can then choose you favourites designs. Its a great brainstorming activity for coming up with lots of designs.
Relevant dimensions or constraints:
How big you want the sketches to be is up to you. The size of the paper would be your constraints.
How big you want the sketches to be is up to you. The size of the paper would be your constraints.
Linked techniques:
Brainstorming
Brainstorming
Health and Safety issues related to Material, Technique or
Process:
You could get a paper cut from the paper or you could hurt your self with the pencil if used incorrectly.
Evaluation (How you found exploring each Material, Technique
or process)
I really enjoyed learning this new process/techniques I think that it will be helpful for me in the future and its a nice way to sketch it's quick and helpful to get all your ideas down on paper.
I really enjoyed learning this new process/techniques I think that it will be helpful for me in the future and its a nice way to sketch it's quick and helpful to get all your ideas down on paper.
To create these designs i had a look at actual websites online and i looked at how their websites were laid out and presented then i sketched out a bunch of designs while taking small elements that i liked from the websites i was looking at.

Thumbnail sketching different types of websites designs

this exercise was simple and easy it didn't take me a long time to do so it was enjoyable.
~~~~~~~~~~~~~~~~~~~~~~~~~~~~~~~~~~~~~~~~~~~~~~~~~~~~~~~~~~~~~~~~~~~~~~~~
Material/Technique/ Process Name: 960.gs Grids
Variations or types i.e. 2B 2H pencil or shape/motion tweening:
There are 3 types of grids the 12-column, the 16-column and the 24-column all different sizes.
There are 3 types of grids the 12-column, the 16-column and the 24-column all different sizes.
How do you use the material/Step by step instructions for technique or process?
These grids are used to help web designers to design a well fitting website on to an internet browser.
You basically just design on top of the grid.
You basically just design on top of the grid.
Relevant dimensions or constraints:
The 12-column grid is divided into portions that are 60 pixels wide. The 16-column grid consists of 40 pixel increments. Each column has 10 pixels of margin on the left and right, which create 20 pixel wide gutters between columns.
The 12-column grid is divided into portions that are 60 pixels wide. The 16-column grid consists of 40 pixel increments. Each column has 10 pixels of margin on the left and right, which create 20 pixel wide gutters between columns.
Linked techniques:
web designing and brainstorming.
web designing and brainstorming.
Health and Safety issues related to Material, Technique or Process:
I can't really think of any health or safety issues with this Process.
I can't really think of any health or safety issues with this Process.
Evaluation (How you found exploring each Material, Technique or process)
This process was new to me and it learnt me more about how websites display on browser and how people design them.


This process was new to me and it learnt me more about how websites display on browser and how people design them.
This exercise was basically thumbnail drawing website designs but with more detail so it was also quite simple and easy to do.
Using 960.gs Grid template to draw a website design.
A more detailed website design using the 960.gs Grid template.
~~~~~~~~~~~~~~~~~~~~~~~~~~~~~~~~~~~~~~~~~~~~~~~~~~~~~~~~~~~~~~~~~~~~~~~~
Material/Technique/ Process Name: Seamless texture
Variations or types i.e. 2B 2H pencil or shape/motion tweening:
N/A
How do you use the material/ Step by step instructions for technique or process?
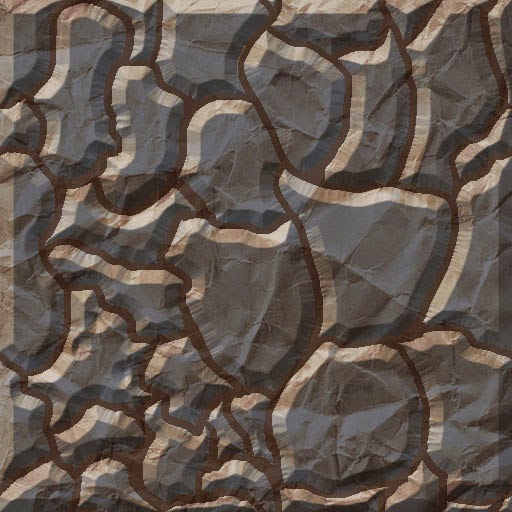
To create a Seamless texture image you need to find a good texture image (like a close up image of a stone) and open it in Photoshop after that you need to add a filter that will show the borders in the middle of the image, to do this you need to go into filters>other>offset and apply it so that the borders are showing in the image, once this is done you can now start to erase these borders with the clone stamp tool by going over the border lines.
Relevant dimensions or constraints:
In Photoshop you can decide on what dimensions you want to use.
Constraints might be the image being to hard hard to erase the borders or an image that has too much of a difference in colour to make it look seamless.
Constraints might be the image being to hard hard to erase the borders or an image that has too much of a difference in colour to make it look seamless.
Linked techniques:
N/A
Health and Safety issues related to Material, Technique or Process:
none that I can think of.
Evaluation (How you found exploring each Material, Technique or process)
Doing this was very new to me, so it was very interesting to learn how to make seamless textures.
after doing it for the first time it then becomes very easy to do again and again.
Seamless textures are used for many things, they can be used for making websites, image editing, textures in video games, textures in 3D designing/modelling and many other things.


This is the design after a bit more development using some of the C.R.A.P principles but it's still not complete, the colours are not right and there is missing text and images.


Overall making this map was very fun.
This map was designed for a multiplayer gamemode called "murder" where one player has a knife and their objective is to kill every other player, and another player has a gun to shoot the murderer, the other players are bystanders and they have to try and not get killed. The reason I chose to make a maze for this type of gamemode was because it would make the game a lot more exciting, you could get lost in the maze and find yourself facing a murderer or you could find your way out of the maze and having a higher chance of survival by hiding behind props or taking advantage of the props to protect yourself from the murderers knife.
 Since it was my first time actually making these kind of things it didn't exactly go as i planned and i encountered lots of problems.
-------------------
Seamless Mossy stone texture.
 I made another seamless texture using some of the same techniques as I did when I made the dried up mud texture but experimented with different colours.
I don't really like the way it turned out I think that the moss is way to green and doesn't really look like moss and looks more like some kind of toxic waste.
This time the texture doesn't have a seam and is seamless.
 ---------------
Making another texture but this time it's all digitally hand painted with Photoshop, and instead of floor textures I made a stone brick wall texture.
Making this texture was a lot different to the other ones because I wasn't using any special bevel and emboss techniques and I didn't use any photos or images to make it (i only used photos and images as reference).

 I really like the way this texture has turned out, compared to my other two textures it looks a lot more normal and understandable you can easily see that this is a stone brick wall that has cracks in it.
The only problem with this texture is that i only drew 2 brick so when you tile the texture you see the same two brick again and again and it loses variety, i only actually realised this mistake once i tested it, to see if there were any seams.


A short video showing the custom textures in game on the maze map I created.
My conclusion on how you should actually make textures with photoshop is that you should digitally hand paint them, with drawing and painting techniques instead of using premade techniques on photoshop like the bevel and emboss technique. Making the textures by hand is better if you want to make something look more organic and natural.
If I had more time to finish this unit I would explore more ways to improve my web design, make my Garry's mod map look more like an old abandoned maze with more environmental props and fix those buggy doors and I would also try and improve my textures to make them look more natural.
Overall i have had fun doing Unit 02 Materials, Techniques and Processes and i have learnt a lot. I have learned new drawing techniques, what paper prototyping is and how to do it, what 960.gs Grid are and what they are used for, using photoshop better, making web designs in photoshop, how to make seamless textures and how to make a playable Garry's mod map. All these new skills will definitely help me in the future.
Doing this was very new to me, so it was very interesting to learn how to make seamless textures.
after doing it for the first time it then becomes very easy to do again and again.
Seamless textures are used for many things, they can be used for making websites, image editing, textures in video games, textures in 3D designing/modelling and many other things.
Here is an example of a seamless texture used within a video game
(The dirt block from Minecraft)
Here are a few examples of some seamless textures that i made using Photoshop.
I went around the college taking pictures of materials and surfaces and then edited the images to make them seamless.
 tiled image of the seamless moss texture
I went around the college taking pictures of materials and surfaces and then edited the images to make them seamless.
texture of moss
making moss into a seamless texture works really well
texture of a plastic bench
texture of a stone slab
texture of a wall
texture of another wall
texture of another wall again ...
trying out different seamless backgrounds
for the main header page of my website design.
This was just a test i might not actual use these designs for my final website design.
This was just a test i might not actual use these designs for my final website design.
~~~~~~~~~~~~~~~~~~~~~~~~~~~~~~~~~~~~~~~~~~~~~~~~~~~~~~~~~~~~~~~~~~~~~~~~
Wireframing
Wireframing is a way to design websites at a structural level using some kind of grid.
For my wireframe of my website design i used Photoshop and a 960.gs 12 column grid to develop my design, after half an hour this is what i came up with, of course it's not finished.
Looking at the C.R.A.P principles.
These principles can be used to design all sorts of things but are mainly used for making website designs. C.R.A.P stands for Contrast, Repetition, Alignment and Proximity.
This is the design after a bit more development using some of the C.R.A.P principles but it's still not complete, the colours are not right and there is missing text and images.
Here is my design after a lot more work has been put into it, I am now happy with the way it looks. Now all i really need to do is design my own logo, add some images and add some real writing.
Making the slam poetry logo for the website (this might not be the final design).
I made the logo in Adobe Illustrator.
At first when making this design i wasn't sure if it would look good but i think it turned out all right, it's supposed to represent a human face speaking out loud (like if it was telling a poem).
The Font i used for the writing is called Foxes In Love and i got it from the Dafont website
I am happy with the design but i might be changing the logo because the title is a bit too small to read.
The image I got for the image section is just a random poetry slam image that i found on the internet and thought it would look good there as an example to show how the images would be presented.
More tweaking on the design: adding social media buttons and an image of slam poetry happening at a school, i also removed a bunch of text so it wouldn't look so boring for the viewers. but i don't really like how there is a blank spot under the image and that the main image in the middle of the screen wasn't made by me.
And extra tweaking done to the navigation bar made it smaller to give more room to the title and logo and I also changed the placing of the image and edited some of the text so it fits well inside of the page.
This is pretty much how I envisioned my final website design to look like and I think it looks good
Overall i am very happy with it I think the colours fit the website well and I think that everything is well place and positioned. For the image section in the middle of the website the way it functions is that when you mouse over of the section 2 arrows will show and when you click on one of the arrows the image displayed will change to the next image.
Quick review on my website design: I personally think that it has really improved from the earlier designs and that it is now professional looking and I have been told by friends and family that it does look quite professional (but I can't really take their comments seriously because they might be saying that just to be nice). And I think that the design really fits the brief, it's appropriate for children and teachers in schools, it's straightforward and easy to access, it looks modern and interesting and contains social media buttons for Facebook, YouTube and Twitter.
Extra experimenting and trying to further on improve my final design.
Experimenting with the colors, i made the blue objects green and the green objects bule and i personally think that it now looks a lot worse than before mainly because it doesn't fit with the image in the middle.

Adding a pattern in the background (link to the pattern HERE)
I think that this pattern actually really fits the designs and makes the website look more aesthetically pleasing, I think I will add this to my final design. this pattern helps the website stand out a lot more instead of having a boring old blue gradient.

Extra experimenting and trying to further on improve my final design.
Experimenting with the colors, i made the blue objects green and the green objects bule and i personally think that it now looks a lot worse than before mainly because it doesn't fit with the image in the middle.
Adding a pattern in the background (link to the pattern HERE)
I think that this pattern actually really fits the designs and makes the website look more aesthetically pleasing, I think I will add this to my final design. this pattern helps the website stand out a lot more instead of having a boring old blue gradient.
This is my final design for the Slam poetry website.
I really wanted to try out more things with this web design but i quickly ran out of ideas that would look good and fit.
I think that my main problem was lack of space.
~~~~~~~~~~~~~~~~~~~~~~~~~~~~~~~~~~~~~~~~~~~~~~~~~~~~~~~~~~~~~~~~~~~~~~~~
Materials, Techniques and Processes Showcase
Here i am going to showcase a few different ways that i experimented with new and old materials, techniques and processes.
Making a Maze in the Hammer map editor for a games that use the Valve Source engine (like Counter Strike source, Garry's mod and Half Life 2)
Here is a rough sketch of a map I did, this was just as a quick practice in making mazes.
Making a Maze in the Hammer map editor for a games that use the Valve Source engine (like Counter Strike source, Garry's mod and Half Life 2)
Here is a rough sketch of a map I did, this was just as a quick practice in making mazes.
Here is a neater maze design that I will use to make the final maze, the S is the spawn area for the player, there are multiple spawn areas for if you are playing the map on multiplayer.
In-game screenshots of the finished map.
A time-lapse video of the process it took to make the maze using the Hammer editor, and testing out the map using the Garry's mod game.
This map was designed for a multiplayer gamemode called "murder" where one player has a knife and their objective is to kill every other player, and another player has a gun to shoot the murderer, the other players are bystanders and they have to try and not get killed. The reason I chose to make a maze for this type of gamemode was because it would make the game a lot more exciting, you could get lost in the maze and find yourself facing a murderer or you could find your way out of the maze and having a higher chance of survival by hiding behind props or taking advantage of the props to protect yourself from the murderers knife.
Overall i think that the map really works for new players who are going to play on this map, they will get lost because it's not as simple as it looks. In the map I added props at the exit of the maze so that when the player comes out of the maze it makes them feel like they have escaped and are free to roam a small city environment with rubbish, a dumpster, rubble, doors and some barrels.
One of the problems I encountered was that the door props wouldn't stay in place and would just float half way through the ground, I think I used the wrong types of doors.
----------------------
Using Photoshop to try and make a seamless texture from nothing.
In this video I experiment with Photoshop and try to make a seamless texture that could be used in a videogame.
This kind of texture could be used for a rocky path or dried up mud floor in a video game.
I really like how the texture turned out but the only problem with it is that it isn't actually seamless as you can see below, seams are showing because of one of the techniques I used on the texture.
If I hadn't of used this technique then it would be seamless.
-------------------
Seamless Mossy stone texture.
I don't really like the way it turned out I think that the moss is way to green and doesn't really look like moss and looks more like some kind of toxic waste.
This time the texture doesn't have a seam and is seamless.
Making another texture but this time it's all digitally hand painted with Photoshop, and instead of floor textures I made a stone brick wall texture.
Making this texture was a lot different to the other ones because I wasn't using any special bevel and emboss techniques and I didn't use any photos or images to make it (i only used photos and images as reference).
The only problem with this texture is that i only drew 2 brick so when you tile the texture you see the same two brick again and again and it loses variety, i only actually realised this mistake once i tested it, to see if there were any seams.
The maze with my custom textures.
It doesn't look as good as I expected it to look like mainly because the stone brick texture doesn't fit with the mossy stone floor texture and the textures look way too big in-game, so I should of draw/painted them smaller.
My conclusion on how you should actually make textures with photoshop is that you should digitally hand paint them, with drawing and painting techniques instead of using premade techniques on photoshop like the bevel and emboss technique. Making the textures by hand is better if you want to make something look more organic and natural.
If I had more time to finish this unit I would explore more ways to improve my web design, make my Garry's mod map look more like an old abandoned maze with more environmental props and fix those buggy doors and I would also try and improve my textures to make them look more natural.
Overall i have had fun doing Unit 02 Materials, Techniques and Processes and i have learnt a lot. I have learned new drawing techniques, what paper prototyping is and how to do it, what 960.gs Grid are and what they are used for, using photoshop better, making web designs in photoshop, how to make seamless textures and how to make a playable Garry's mod map. All these new skills will definitely help me in the future.


.png)
